Multimedia User's Guide
For SunOS 4.1.x/OpenWindows 3.07 and SunOS 4.1.x/X11R5 1.1
Parallax Graphics
Part Number: 917-026141 Rev. E
Table of Contents
Introduction
Setting up videotool and movietool
Using videotool
Starting videotool from the UNIX Command Line
Starting videotool from the Workspace Menu
Using the videotool pulldown menu
Opening an Input Window and Displaying Live Video
Displaying live Video on the Second Channel for XVideo-VIO/RGB Users
Using Video Configuration Control Panel Window
Changing the VideoTool Display Setups
Format Types
Changing the Video Format
Stretching and Squeezing Video
Cropping Video
Scaling Video
Freezing Video
Changing the VideoTool Color Setups
Changing Color
Saving Color
Resetting Factory Settings
Recalling Settings
Saving and Freezing Video
Freezing and Saving an Image
Freezing and Saving a Compressed Image
Loading a Still Image File
Recording JPEG-compressed Digital Movies
Reviewing Disk Storage Requirements
Recording a Digital JPEG Movie from a Live Source
Adjusting JPEG Compression Controls
Adjusting SPARCaudio Controls
Playing JPEG-compressed Digital Movies
Sending a Screen Session to Videotape
Closing a videotool Input Window
Quitting videotool
Using movietool
Using movietool from the Video Menu
Dismissing movietool Error Messages
Using movietool from the File Manager Window
Using the movietool Control Panel
Starting movietool From the UNIX Command Line
movietool Start-up Command
Optional Arguments
Start-up Example
Quitting movietool
Setting Up movietool
Appendix A: Troubleshooting Guidelines
Congratulations on your purchase of one of Parallax's premiere products for
workstation video.
The VideoStream(tm) family of the MultiVideo(tm), PowerVideo(tm), and XVideo(tm)
products from Parallax come with two standard applications that we think you'll
find invaluable and enjoyable to use: videotool and movietool. This guide provides
tutorials to ease your introduction to the features and functions of these applications.
We recommend that you check our Release Notes and the $PARALLAX_HOME/README
file before you begin these tutorials, as additional or new information becomes
available after printing.
If you need any technical assistance as you get acquainted with these applications,
please contact Parallax Technical Support:
Parallax Graphics-East
Herndon, VA USA
tel: +1 703 450 7718
fax: +1 703 450 7719
email: tsupport@parallax.com
You need to complete these few setups to use the VideoTool and MovieTool applications:
1. Install your Parallax Video board as described in the
Parallax Graphics Hardware Installation Guide
2. Install your Parallax Video software and start up the
OpenWindows server.
See your Parallax Graphics Software Installation Guide for details.
3. For videotool: Connect a video input device.
Most of the features in VideoTool are inaccessible until a video input
source is provided.
Your Parallax Graphics Hardware Installation Guide provides details
for connecting a video input device to your Paralalx Video board.
Steps for starting videotool and displaying live video in a window are
provided in the chapter Using videotool.
4. Steps for starting movietool and displaying live video in a window are
provided in the chapter Using movietool.
videotool is an application for displaying, controlling, and saving live video
on Sun workstations.
- You can play, movie, and resize analog and digital video by using mouse-
oriented menus, slider panels, and dialog boxes. No special programming skills
are necessary.
- Video images can be saved in Sun Raster File, Parallax JPEG, or JFIF
formats and then converted with generally available software to any popular format.
- For developers, source code for videotool is available as part of the
Video Development Environment. Ask your Sales Representative for more information.
Before starting this application, complete the setups described in the Introduction.
You can start videotool from the UNIX command line on the Sun workstation. To start
videotool, do the following:
1. Type videotool
at the shell prompt.
2. Press <Return>
The videotool Control Panel window appears.
See Figure 2-1.
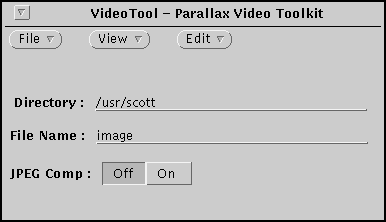
Figure 2-1 Opening the videotool Control Panel
If you have installed the Parallax Video menu in your Openwindows
user environment, you can start videotool from the Workspace menu as
follows:
1. Display the Workspace menu by pressing the right mouse button.
2. Select Video using the left mouse button.
The Live Video menu appears.
3. Select VideoTool.
The VideoTool control window appears. See Figure 2-2.
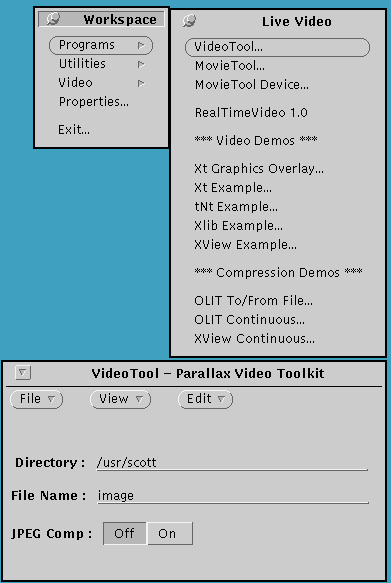
Figure 2-2 The VideoTool Control Panel Window
The videotool control window offers three main pulldown menus for your
use: File, View, and Edit. Use the File menu to
load and save video files, the View menu to display video, and the
Edit menu to make changes to the video input display.
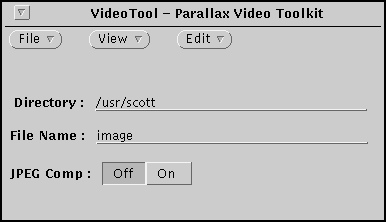


Figure 2-3 VideoTool pulldown menus.
To display live video in the VideoTool Input window, do the following:
1. Open the VideoTool Control Panel window.
2. Select Input 1 from the View menu.
Live video displays in the Input 1 window:
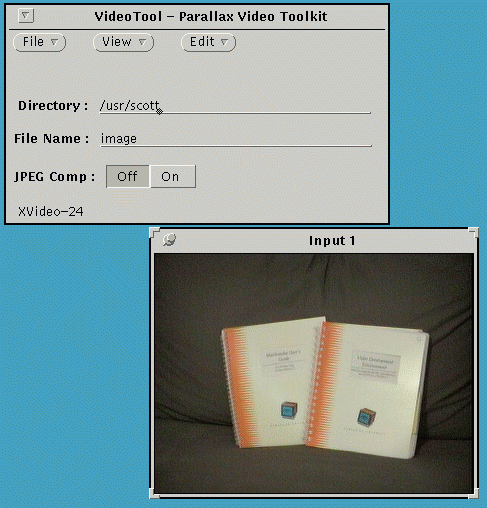
Figure 2-4 Opening Input 1..
For XVideo-VIO/RGB users (only): Select Input 2 from the View menu to display
video in the Input 2 window.
Note: The following tips help display video:
- Check that an analog video input device is connected, ON, and playing: See your
Parallax Video Hardware Installation Guide for details.
- To enable video input from an SVHS (Y/C), RGB, or YUV video device, you may need
to change the video format setup as described in the next section.
- See Appendix A: Troubleshooting Guidelines for troubleshooting tips.
With XVideo-VIO/RGB, you can connect and display video in Input 1 and Input 2
at the same time, as shown in the following figure:
No figure available.
Figure 2-5 Opening Input 1 and Input 2 windows.
You can select a video format; set up window controls for scaling, cropping, and
resizing the video display window; and freeze an image for capture with the Video
Configuration Control Panel.
To change the display setups, do the following:
1. Open the VideoTool Control Panel window.
2. Click on the View menu.
3. Select either Input 1 or Input 2.
4. Click on the Edit menu.
5. Select Config.
The Video Configuration Control Panel appears. See Figure 2-6.
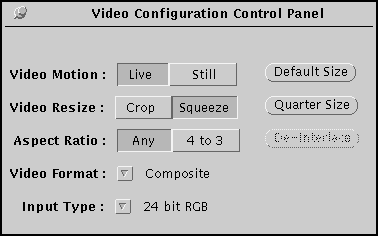
Figure 2-6 The Video Configuration Control Panel
Note: Parallax Video boards are designed to work with truecolor,
24-bit RGB inputs form a connected video device, For this reason,
24-bit RGB is selected as the default input type and cannot be
changed. Selections other than 24 bit RGB are not currently
supported.
Parallax Video boards are designed to display four types of video formats:
Composite, SuperVHS, RGB, or YUV formats.
Composite Format
Composite is standard format for most commercial video devices. It is
supported by all Parallav Video boards and is the videotool default
format. Other formats are SuperVHS, RGB, or YUV.
SuperVHS, RGB, or YUV Formats
SuperVHS (Y/C, S-Video) is only available to XVideo-VIO users.
Select this option to display video in Input 2.
YUV or RGB can be supported with XVideo-RGB users. RGB,
the default, is selected automatically for RGB/YUV devices. Select
YUV from the Video Format menu to change the format for YUV-
component devices.
To change the Composite format and display video from an SVHS, RGB,
or YUV (component) device in an open Input 2 window, do
the following:
1. Click on the title bar of the Input 2 window to bring it
to the foreground. Configuration changes affect the Input
window in the foreground.
2. Click on the Video Format pop-up menu.
3. Select the video format. See Figure 2-7.
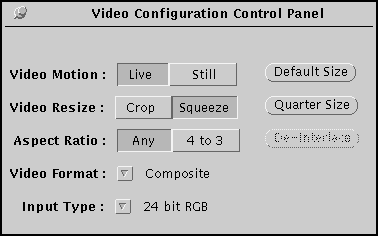

Figure 2-7 Displaying the Video Format pop-up menu.
To stretch or squeeze video to fit in a sized-down video window,
do the following:
1. Open the Video Configuration Control Panel
2. Leave the Squeeze and Any buttons selected
(these are set by default).
3. Resize the window. See Figure 2-8.
The video image will fit the shape of the window and can be stretched
or squeezed. For NTSC, the maximum window height and width is
640x480; for PAL/SECAM, the maximum window height and width is
768x572.
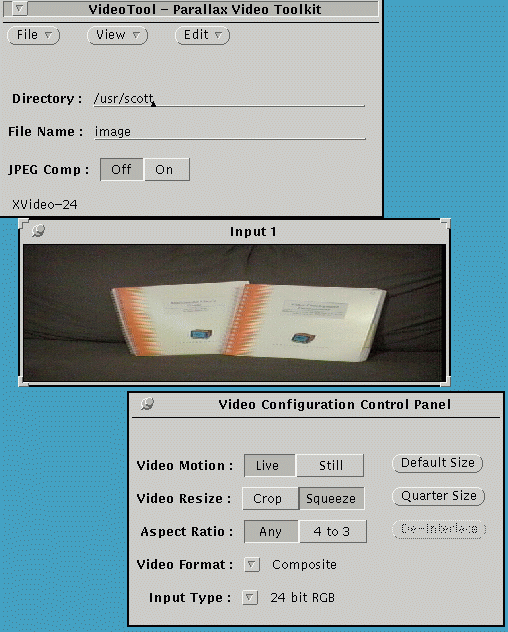
Figure 2-8 Squeezing or stretching the video display image.
To crop video to fit in a sized-down video window, do the following:
1. Open the Video Configuration Control Panel
2. Click on Crop
3. Resize the video window. See Figure 2-9.
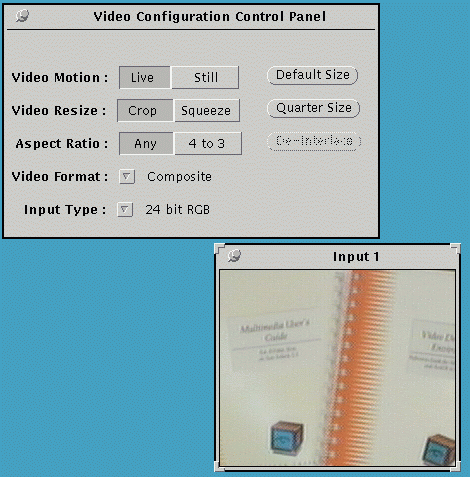
Figure 2-9 Cropping the video display image
Note: Cropping always defaults to the upper left hand corner.
To scale video to fit in a sized-down video window, do the following:
1. Open the Video Configuration Control Panel
2. Click on 4 to 3
3. Click on Squeeze
4. Resize the video window. See Figure 2-10.
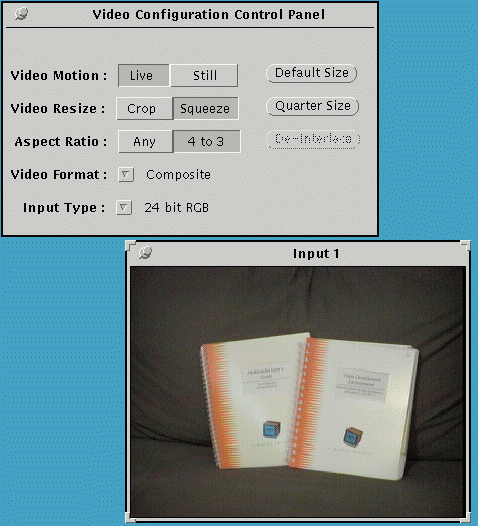
Figure 2-10 Scaling the video display image
The video is scaled to fit in the window: The NTSC and PAL standard image
aspect (width-to-height) ratio of 4:3 is maintained, and the window snaps
to the nearest relative 4:3 size.
5. To scale the video display window to one-fourth the size of the
default-sized window, point to the Quarter Size button and click.
The window resizes to 320x240 for NTSC and to 384 x 286 for PAL.
6. To restore the sized down video display window to its default size,
point to the Default Size button and click.
The window returns to the videotool default size.
Use the Live and Still buttons to freeze a frame of video in
the video display window.
1. Click on Still to freeze a frame of video in your video display window.
This freezes a frame of video in your video display window, but does not stop
a video device from playing. Press pause on the video player if you wish
to pause the video.
2. Save this image by following the steps described in
Saving and Freezing Video later in this manual.
3. Click on Live to restore live video in your video display window.
Note: The De-interlace button is not currently supported
You can change the hue, contrast, saturation, and brightness of your video
input display by using the sliders in the Video Color Control Panel
window. Additionally, you can point-and-click to save adjusted settings as
user preferences, make new adjustments, and recall your preferences or the
factory settings. See Figure 2-11.
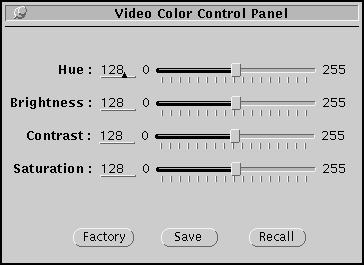
Figure 2-11 Video Color Control Panel window.
Note: For PowerVideo and XVideo/XV24SVC(only): The color setups of a digital
JPEG movie file are saved with the file at record time. The controls on this panel,
therefore, have no effect on the video display window during playback of a digital
JPEG movie file. To save a movie with adjusted values, adjust the color of the
video display prior to recording the digital JPEG movie.
To change the color setups, do the following:
1. Open the VideoTool Control Panel window.
2. Click on the View menu.
3. Select either Input 1 or Input 2
4. Click on the Edit menu.
5. Select Color
The Video Color Control Panel window appears.
You can change the hue, saturation, brightness, or contrast of the
display video, by doing one of the following:
- Drag the box along each slider until you get desireable results
in your display video.
- Highlight the current value and type in a new value (0 through 255 are valid)
- Point to a tick mark on the slider and click to reposition the box to
a new value on the slider
Note: Hue is not adjustable under PAL.
To save your adjusted settings to a user-preferences file, click the Save button.
To reset the factor settings, click the Factory button.
Repeat step 1 to make other adjustments, then click the Recall button to recall
your user-preferences.
You can freeze and save individual frames of video to disk in one of
three file formats: 24-bit Sun Raster, Parallax Joint Photographics Expert
Group (JPEG) compressed, or JPEG File Interchange Format (JFIF) compressed.
To freeze video in your input window, do the following:
1. Open the VideoTool Control window.
2. Click on the View menu.
3. Select either Input 1 or Input 2.
4. Click on the Edit menu.
5. Select Config
The Video Configuration Control Panel appears. See Figure 2-12.
6. Click Still to freeze video in your video input window.
Note: The current video display freezes in your input window,
but does not stop your video device from playing.
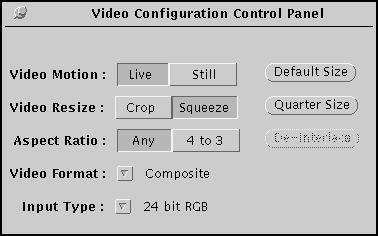
Figure 2-12 Click still to freeze video in a window.
7. Highlight the directory and/or file name on the VideoTool Control Panel
and enter a unique name, or leave these unchanged to save a file named image
to the current directory:
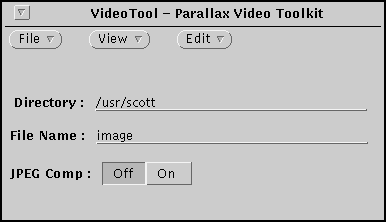
Figure 2-13 Saving a still image.
8. Click on the File menu. (Use the right mouse button).
9. Select Save Still.
A freeze frame of the image is captured and then saved to the file in the
format that you've selected.
Click Live on the Video Configuration Control Panel to restore
full=motion video in your video input window.
PowerVideo and XVideo/XV24SVC products allow you to save the file in
a Parallax JPEG or JFIF compressed format.
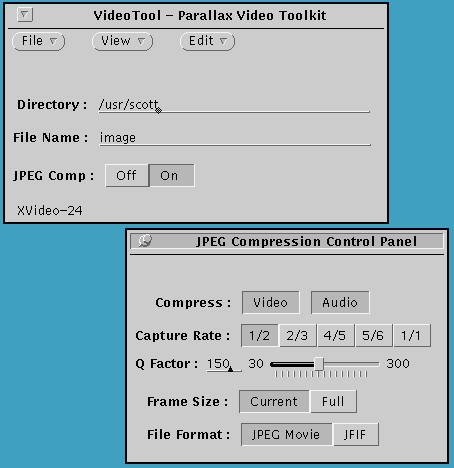
Figure 2-14 Compressing a still image.
To view and save the file in a compressed format, do the following:
1. Click ON the JPEG-Compression button on your VideoTool Control Panel
window.
Note: Leave this button Off if you want to save a 24-bit Sun rasterfile.
2. Click on the Edit menu.
3. Select JPEG to display the JPEG Compression Control Panel. See
Figure 2-14.
4. Leave JPEG Movie (the default) selected to save the file as a 24-bit
JPEG image. Or, click JFIF to save a JFIF file.
5. Use the default Capture Rate and Q Factor settings, or adjust these
following the steps in Adjusting JPEG Compression Controls
6. Choose a directory or filename.
7. Click on the File menu. (Use the right mouse button).
8. Select Save Still.
A freeze frame of the image is captured and then saved to the file in the format
that you've selected.
9. Click Live on the Video Configuration Control Panel to restore
full-motion video in your video input window. See Figure 2-15.
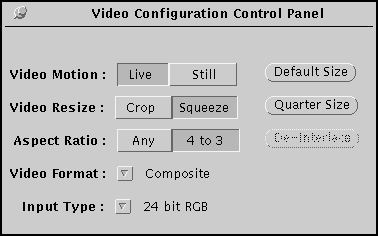
Figure 2-15 Click Live to restore full-motion video.
To load a still image file do the following:
1. Click on the title bar of your video input window to bring it to the front
before loading a 24-bit image.
2. Choose a directory or file name.
3. Click on the File menu.
4. Select Load Still.
This loads the image in the window.
Note: You may also use Openwindows' drag-and-drop utility to load a
24-bit image in the video input window.
For PowerVideo and XVideo users, videotool offers two methods of recording
digital JPEG-compressed movie files:
- Using the Save Movie option on the File menu in the
videotool Control Panel, you can record a digital movie to a UNIX
file from a live source. For more information, see
Recording a Digital JPEG Movie form a Live Source.
- Using the Device Control Panel, you can record a digital movie
from a controlled "frame-accurate" source. For more information, contact
your Parallax Graphics customer support representative.
Before you begin your recording session, review the following:
- For recordings of A/V movies at quarter size using all of the default
settings, you'll need about 12 Mbytes of memory for every minute you record.
- For video-only movies, you'll need about 8 Mbytes of memory for every
minute that you record.
Note: Check to make sure that you have sufficient disk storage.
Limit your recording session to avoid exceeding the amount of disk storage
available. If you exceed the capacity of your disk, your recording session will
be discontinued, and you'll need to start again.
To digitally record a movie from a Live source, do the following:
1. Connect your video and audio devices: power these On; and press the Play
button on your devices to start up your audio/video.
See your Parallax Video Hardware Installation Guide for details.
2. Open the videotool Control Panel window. Set up your input window
for digital recording as shown in Figure 2-16.

Figure 2-16 General setups for a live recording.
a. Enter a directory and file name for the movie.
b. Click ON JPEG Compression.
3. Open the Video Configuration Control Panel window.
a. Reduce the video window to Quarter Size.
4. Click on View in the videotool Control Panel window.
5. Select Audio 1.
The Audio Control Panel appears.
6. Enter your audio capture setups. See Figure 2-17.
Use the default setups, with this exception:
- To increase the volume that you'll recored at (set the default volume
of your movie to a higher setting), drage the box along the RECORD slider
to a higher setting.
- For tips on how to further adjust these settings to alter your recording,
please refer to Adjusting SPARCaudio Controls.
7. Open JPEG Compression Control panel, enter your capture/compression
setups. See Figure 2-18.
Use the default settings with this exception:
- If you wish to capture video-only, click the Compress Audio
button Off.
- For tips on how to further adjust these settings to alter your
recordings, refer to Adjusting JPEG Compression Controls.
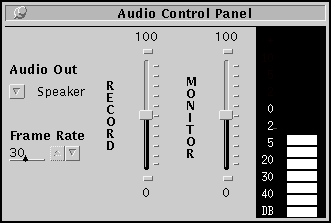
Figure 2-17 Audio setups for a live recording.
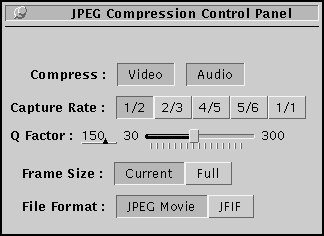
Figure 2-18 JPEG setups for a live recording.
8. Click on the File menu in the videotool Control Panel
window and select Save Movie. See Figure 2-19.
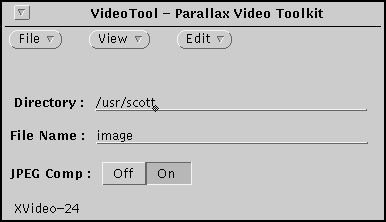

Figure 2-19 Starting a live recording.
The following message appears on your screen:
Place pointer inside the currently active video input window
Use MIDDLE mouse button to start (down) and stop (up) movie
9. Click OK; place the pointer inside of your video input window.
10. Press and hold the middle button on your mouse to begin your
recording.
The message Movie Started appears in the lower right-hand corner
of your videotool control window.
11. Release the mouse button when you finish your recording.
The message Movie Completed appears in the lower right-hand corner
of your videotool control window.
12. Play back your movie file by following the procedures in
Playing JPEG-compressed Digital Movies
You can change the JPEG-compression setups before recording a JPEG
movie or capturing a still by using the JPEG Compression Control Panel
window.
To open the JPEG Compression Control Panel, do the following:
1. Click ON JPEG Comp on the videotool Control Panel.
See Figure 2-20.
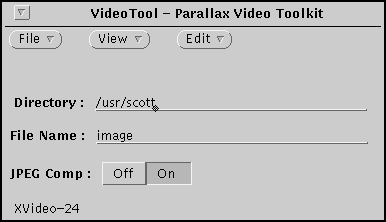
Figure 2-20 Enabling JPEG compression.
2. Click on the Edit menu.
3. Select JPEG
The JPEG Compression Control Panel appears. See Figure 2-21.
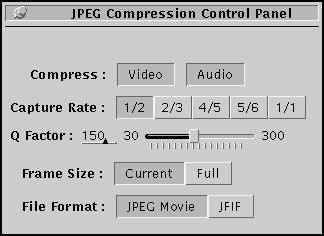
Figure 2-21 JPEG Compression Control Panel.
To change the JPEG-compression setups, do the following:
Recording Video Only
- Click the Off Audio button.
Note: By default, both Audio and Video buttons are On, and
both audio and video will be captured if these are not turned to Off.
Selecting a New Frame Recording Ratio
- Click on one of the Capture Rate buttons to select a new frame recording ratio.
Note: The Capture Rate buttons allow you to specify a number of frames to
capture from the video being displayed in the Parallax Video frame buffer.
Options include the following:
| Capture Rate |
Description |
| 1/2 |
Default setting--Specifies a capture rate of one-out-of-two frames. |
| 2/3 |
Specifies a capture rate of two-out-of-three frames. |
| 4/5 |
Specifies a capture rate of four-out-of-five frames. |
| 5/6 |
Specifies a capture rate of five-out-of-six frames. |
| 1/1 |
Specifies that every frame should be captured |
Table 2-1 Recording ratio capture rate options.
Note: The default of 1/2 is recommended for general use.
Selecting a New Q Factor
The Q factor allows you to adjust the compression rate to accommodate
specific user requirements.
- Raising the Q factor (quantization factor) increases the amount of video
compression, which may be desirable for networked or storage intensive applications.
- Lowering the Q factor decreases the amount of video compression, which retains
more video data (i.e. more image realism and detail) yet requires more bandwidth
and disk storage space.
Note: The default of 150 is recommended for general use.
To change the Q factor, do one of the following:
a. Highlight the value in the Q Factor field and type in a new value.
b. Drag the box along the slider until you get the desired setting (30 through 300).
Selecting a Full-size Window
To select a full-size window for capture, click the Full button.
- The Quarter Size setting is recommended for general use to achieve
near realtime playback on any SPARCstation.
- Full size will compress/record video at the default videotool window
size (640x480 for NTSC or 768x572 for PAL).
Note: You can drag the input winodw to any size at which you wish to
compress/record video. By default, Current is On. Video will
be recorded at the current window size.
Creating the JPEG Movie File
- Leave the File Format set to JPEG Movie. A JPEG movie file is created.
You can adjust the SPARCaudio controls using the Audio Control Panel. It is
designed for use with the videotool digital JPEG recording functions.
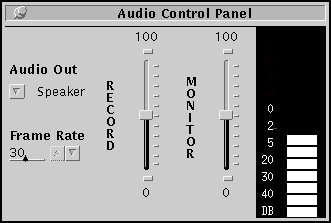
Figure 2-22 Audio Control Panel.
Note: The Audio Control Panel is designed for use with videotool's
digital recording function only, and not for general SPARCaudio control.
For general SPARCaudio control, we recommend that you use Sun's AudioTool, which
is available from the OpenWindows menu.
To open the Audio Control Panel, click the View menu to select
Audio 1, then release the mouse.
To change the SPARCaudio controls for digital JPEG recordings, do the following:
1. Open the videotool Control Panel
2. Click on the View menu.
3. Select Audio 1.
The Audio Control Panel then appears. See Figure 2-22.
4. Click on the Audio Output button. See Figure 2-23.
Note: Check that an audio device is connected, ON, and playing.
See your Parallax Video Hardware Installation Guide for details.
5. Select External from the pop-up menu to redirect audio output to
the external speaker. (Use the right mouse button).
Note: Speaker, the default audio option, directs audio output to
the internal SPARCstation speaker.
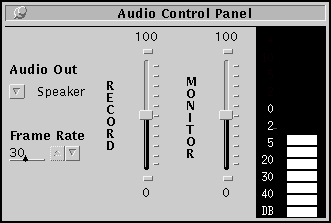

Figure 2-23 Audio Out pop-up menu.
Adjusting the Frame Rate
The default Frame Rate of 30 is recommended for general use. If you wish to adjust
the Frame Rate, enter a frame rate that matches the video capture rate that your
system will support.
- Digital movies recorded from PAL/NTSC video on a SPARCstation 10 or 600 MP--
using the default videotool settings and a Quarter Size image--will capture
between 18 (PAL) to 24 (NTSC) frames per second (fps).
- Movies recorded on a SPARCstation 2, IPX--using the default videotool settings
and a Quarter Size image--will capture between 15 (PAL) to 20 (NTSC) fps.
- And movies recorded on a SPARCstation 1 or IPC--using the default videotool
settings and a Quarter Size image--will capture between 13 (PAL) to 18 (NTSC)
fps.
Note: A full-size NTSC movie captured with the factory default settings
can be played back at 15 fps or less.
Recording Volume
The default Record volume is recommended for general use. Raise the
volume if you want the default volume of your movie to be louder.
For PowerVideo or XVideo/XV24SVC Users Only
- Use the Frame Rate to adjust the audio-capture rate to synchronize
audio with the video.
- Use the Record slider to adjust the volume of the audio on playback
and use the Monitor slider to adjust the volume of the movie audio
on playback.
To play back your digital movie file, do the following:
1. Set up the audio playback controls as shown in Figure 2-24.
- To use an external speaker, drag through the Audio Out pop-up to
select External.
- Drag the Monitor slider to zero (0) to turn off the audio input
channel during playback; This ensures that only your movie audio playing on
the audio output channel will be heard.
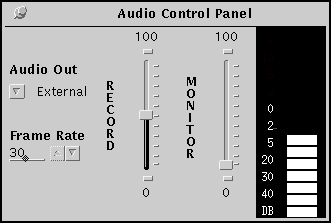
Figure 2-24 Audio setups for a movie file playback.
2. Click on the title bar of your video input window to bring it to
the front before loading a movie.
3. Play the movie in one of the three ways shown below.
a. Playback--Using the videotool Control Panel window. See Figure 2-25.
Select Load Movie from the File menu. The movie stored in the directory
and file name specified on the videotool Control Panel will play in your
video window.
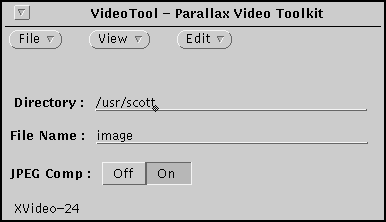

Figure 2-25 Loading the movie.
b. Playback--Using the Device Control Panel. See Figure 2-26.
- Select JPEG Movie from the Video Protocol pop-up.
- Enter the name of the movie file in the File Name field.
- Click Initialize to start the control.
- Click the Play button to play your movie file.
Your movie plays once through. With this panel, the movie can be played again
and again, and controlled as if it were being played from a "virtual videodisc".
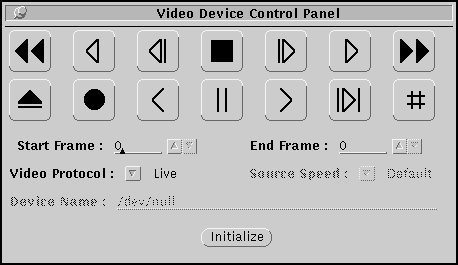
Figure 2-26 Using the Device Control Panel.
c. Playback--Using the movietool Application.
See Chapter 3, Using movietool for more details.
With XVideo-VIO, you can output a screen session to videotape.
To output a screen session to videotape, do the following:
1. Connect your VCR's video input to the XVideo's video output port and
power it on. See Figure 2-27.
See your Parallax Video Hardware Installation Guide for details.
Note: See your vendor manual for steps on how to set up your VCR to
record video from a computer screen to the VCR's Video In port.
2. Insert a videotape into your VCR.
No figure is available.
Figure 2-27 Recording an interactive session.
3. Click on the View menu in the videotool Control Panel window.
4. Select Output 1.
This displays the Video Output Control Panel. See Figure 2-28.
5. Click one of the Output Size buttons:
- Click Scaled 4 to 3 to constrain the video output to a 4:3
image aspect (width-to-height) ratio at all times. A 4:3 image aspect
ratio is standard for NTSC and PAL signals.
- Click Fixed to force output to be the size of the signal-standard
rectangle, which is 640x483 for NTSC or 768x575 for PAL. (Aspect Ratio
setting will always be 4:3.
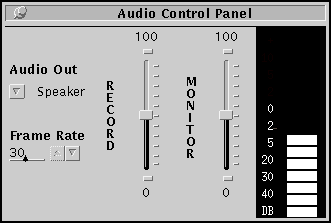
Figure 2-28 Video Output Control Panel.
- Leave Any selected to allow video to be scaled at any width-to-height
image ratio. An output region or window can assume any unconstrined width-to-height
image ratio. The image will fit the width-to-height ratio of the window and,
through the resize of a window, output can be stretched or squeezed.
6. Click on of the Output Movie buttons:
- Leave Region selected to declare a region of your current screen as an
output rectangle.
- Click Window to declare an active window as your output rectangle.
7. Point to the Configure button to declare an output image.
No figure available.
Figure 2-29 Video Output Mouse Controls.
With Region selected: Use the left mouse button to reposition the
white bounding box on your screen; use the middle mouse button to drag a
corner and resize the region for output; or use the right mouse button
to cancel the configuration.
For example, try this: Bound an area of the display that contains a
portion of the Input 1 window and a portion of the videotool
control panel on your OpenWindows desktop.
8. Point to the On (Video Output) button and click to enable output
to the connected output device.
9. Begin your session.
Try this: Drag the videotool window in-and-out of your video output display region.
You screen session will be recorded to the VCR tape.
10. Point to the Off (Video Output) button on the videotool Output Control
Panel and click to disable output.
11. Disable recording from your output device.
To close an input window, press the right mouse button and select Dismiss
from the pulldown window menu. See Figure 2-30.
No figure is available.
Figure 2-30 Closing an input window.
To quit VideoTool, press the right mouse button and select Quit from
the pulldown window menu. See Figure 2-31.
No figure is available.
Figure 2-31 Quitting videotool.
movietool is an application for playing digital JPEG Movie clips recorded with
videotool and is the perfect complement to any office automation, multimedia
presentation, and authoring software where video is required.
movietool can be stared readily form a standard OpenWindows menu or File Manager
window, providing a method for quick and easy playback of movie files.
For the command-line user, movietool can also be stared from a UNIX command line.
The movietool command set offers a full line of options for customizing movietool's
runtime and file-playback behavior, allowing users to invoke movietool as a highly
useful movie file controller or as a ToolTalk application.
If you have installed the Parallax Video menu in your OpenWindows user environment,
you can start up movietool form the Video menu by doing the following:
1. Display the Workspace menu. (Use the right mouse button).
2. Select Video.
The Video menu appears. See Figure 3-1.
3. Drag through the Video menu to select MovieTool, then release.
The movietool Control window appears (black window, but with controls). See Figure 3-1.
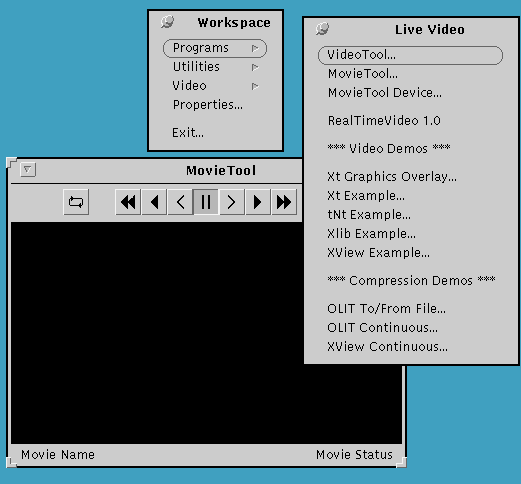
Figure 3-1 The movietool Control window.
Note: More than one movietool can be running at the same time. Since SPARCaudio
can only connect with one audio client, only the first instance to be started with audio
ON will have sound provided. Use the Sun audiotool to control the SPARCaudio speaker volume.
4. Click on the movietool Options pop-up menu.
Note: From within the movietool window, click the right mouse button.
5. Select File Name.
6. Type in the name of the movie file that you wish to play--including the directory--
in the File Name dialog box; and click Load. See Figure 3-2.
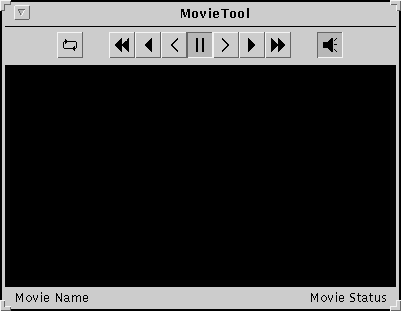


Figure 3-2 Loading a movie.
7. Play the movie.
Follow the instructions described in Using the movietool Control Panel to play
the movie.
Note: The movietool window will adjust to the size of the JPEG Movie on playback.
For example, if the JPEG Movie was recorded at quarter-size, the movietool window will resize
to a quarter-size on playback.
You can also select MovieTool Example from the menu. This menu option starts
movietool (without controls), plays the movie file, /usr/parallax/bin/image, then quits.
If you enter the name of a non-existent movie file the the File Name dialog box, movietool
displays these error messages:
System error: No such file or directory
Unable to initialize movie source. Open Failed
Dismiss the messages and try again, taking care to enter the name of a valid movie file.
With OpenWindows running, you can start up movietool from the File Manager
by double clicking the movietool application icon and dragging-and-dropping a
movie file for playback:
1. Open the File Manager window and go the $MOVIETOOLHOME.
2. Double-click the movietool application icon to start the application as a movie file
controller.
The movietool window shown in Figure 3-3 appears. The window is black until you select
a movie file for playback in the window. See Figure 3-4.
Note: The Sun-default application icon appears in the File Manager window
if you have not updated your cetables with the Parallax icon bindings.
3. Drag and drop the movie file image from the File Manager window into the
movietool window to play the movie once through:
You can also double click any JPEG Movie file icon in the File Manager window
to start movietool and play the movie file once, then quit.
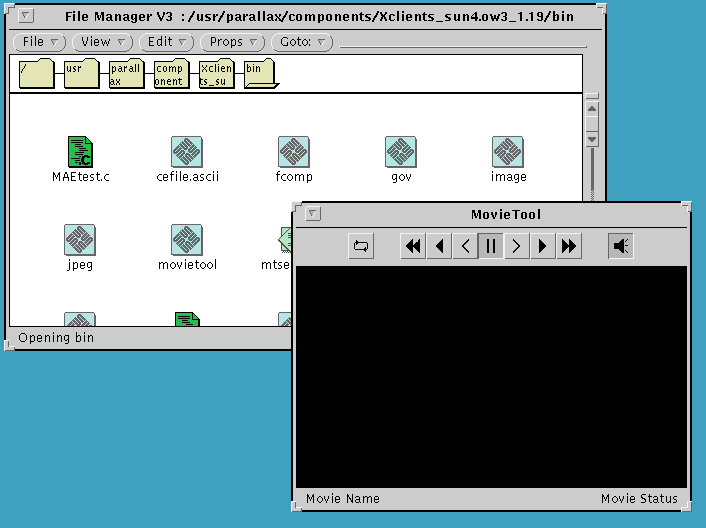
Figure 3-3 Starting the application as a movie file controller.
You can use the following playback control buttons in the movietool Control window.
See Figure 3-4.

Figure 3-4 movietool Control buttons.
| Button |
Description |
| Auto Repeat On/Off |
Plays movie repeatedly: When the end-of-movie is reached, loops back to the start and plays the movie again. |
| Fast Reverse |
Plays movie in reverse at twice the frames-per-second speed defined in the header
of the JPEG Movie file. |
| Reverse Play |
Plays movie in reverse at the frames-per-second speed defined in the header of the JPEG
Movie file. Useful as a "rewind" control if Auto Repeat is not on. |
| Step Back a Frame |
Displays movie one frame at a time in "step back" sequence |
| Pause |
Pauses movie playback, displaying the current frame of the movie in the window. |
| Step Forward a Frame |
Displays movie one frame at a time in "step through" sequence |
| Forward Play |
Plays movie forward at the frames-per-second speed defined in the header of the JPEG
Movie file. |
| Fast Forward |
Plays movie forward at twice the frames-per-second speed defined in the header of the
JPEG Movie file. |
| Audio On/Off |
Turns movie audio on/off |
Experienced users who wish to customize the runtime and movie-playback behavior of
movietool can start movietool with the UNIX command set described below. This command
set can be exectued from a UNIX command line, from within a third-party application
program, or from a shell script (like the .openwin-menu file).
movietool [optional arguments]
-h Prints a list of help messages to the screen.
-a Invokes movietool in Audio Off mode. This option cannot be used in combination
with the -n option described below.
-r Invokes movietool in Auto Repeat mode. This option cannot be used in combination
with the -n option described below.
-s Invokes movietool as a ToolTalk application. Started in this way, movietool will
listen for messages form the ToolTalk server.
-n Invokes movietool without a device control panel.
-p Invokes movietool in Play mode. Used with the -f option below, movietool will
play the specified file on start-up.
-f filename Specifies a movie file for playback. Use with the -p option
above to play movie on start-up or use the device-control panel to play movie after start-up.
Should not be used with -n option unless -p is specified.
Use the -h option with the movietool start-up command...
movietool -h
...to print help messages to the screen:
usage: movietool [-h] [-a] [-r] [-s] [-n] [-p] [-f filename]
options:
-h help
-s MovieTool is invoked in Audio Off mode
-r MovieTool is invoked in Auto Repeat mode
-s MovieTool is invoked in ToolTalk Server mode
-n MovieTool is invoked without the device panel
-p MovieTool is invoked in Play mode
-f filename MovieTool is invoked with the specified filename.
To quit movietool, select Quit from the pulldown window menu.
If you wish to install and use Parallax icons for movietool and JPEG
movie files, complete the following basic environment setups:
1. Install movietool with the Parallax Video software as described in your
Parallax Video Software Installation Guide.
Note: this application relies on the JPEG compression hardware on the
PowerVideo, XVideo/XV24SVC, and XVideo-VIO board, and will not run on MultiVideo.
2. Edit your .cshrc file to add the movietool environment variable.
setenv MOVIETOOLHOME /usr/parallax/bin
If you plan to request movietool as a ToolTalk client, you'll also need to set up
the CEPATH environment variable.
If you already have a CEPATH defined in your .cshrc, add this line below it:
setenv CEPATH $HOME:/.cetables:/etc/cetables:$OPENWINHOME/lib/cetables:$CEPATH
3. If you do not have a CEPATH defined in your .cshrc, add this line:
setenv CEPATH $HOME:/.cetables:/etc/cetables:$OPENWINHOME/lib/cetables
4. Once you've modified your .cshrc, exit OpenWindows, source the .cshrc to add the
newly defined variables to your environment, and restart OpenWindows.
5. Run the movietool setup script to set up your OpenWindows user desktop with
movietool and JPEG movie file icons:
prompt: $MOVIETOOLHOME/mtsetup.sh
A sample script session is provided below:
*********************Welcome to the MovieTool Setup Script*************************
This script create/updates a user cetable with icons & data types
used by MovieTool.
These icons & data types are defined in the Parallax release files
$MOVIETOOLHOME/cefile.ascii & $MOVIETOOLHOME/plx.types.model.
Creating a user cetables in /home/.cetables...
If you're having trouble using videotool, take a minute to check your device
connections and serial I/O port setups.
A few tips to help you detect and correct these and other problems that
you might encounter are provided on the following pages.
If a problem persists, and you find that you need technical assistance,
please contact your Parallax Technical Support representative.
Can't Open Input Window: No Sync Detected Error
Problem: If your video input device is not connected properly--
or if your video device is not turned on --you'll get the message shown
below when you try to open an Input window:
No sync detected-check input connection
Solution: Click OK to dismiss this message. Check your connections
and then repeat the steps in Opening an Input Window and Displaying Live Video to display video in a window.
Monitor Blacks Out
Problem: If the monitor blacks out while the Parallax Video software is running.
Solution: Check that your Parallax Video and Sun Monitor cables are correctly and
securely connected.
Solution: Check that your Parallax Video board is securely seated in the SBus slots.
Solution: Check that your monitor is on.
No Video in an Open Input Window
Problem: If video does not display in an open Input window.
Solution: Check that your cables are correctly and securely connected.
Solution: Check that your connected video device is ON and playing.
Solution: If you've connected a component SVHS, RGB, or YUV device to
an XVideo-VIO/RGB HD15 connector, check to make sure taht the component video
format for your device is selected on the Video Configuration Control Panel.
Video Format Not Supported
Problem: If you select a video format from the Video Configuration Control
Panel that does not match the signal type of the connected device, you'll get
the following message:
This format is not supported
Solution: To dismiss this message, click OK. You need to select the
format that corresponds to your connected video device. Check your device-vendor
manuals to verify the format types supported.
Video Input Type Not Supported
Problem: If you select an input type other than 24-bit RGB from the Video
Configuration Control Panel, you'll get the following message:
This video input type is not supported
Solution: To dismiss this message, click OK. The 24-bit RGB format
is the only input type currently supported by Parallax Video boards.
Error When Opening an Edit or File Menu Option
Problem: If you select an Edit menu item before opening a video window,
you'll get a message similar to the following:
Can't display Video Device Control Panel without at least one active video channel!
Solution: To dismiss this message, click OK. An Input window must be
opened before you can use any of the videotool Edit and File functions.
Video Flashing With Window/Mouse Events
Problem: When the Set Input Area option on your OpenWindows Workspace Properties/
Miscellaneous sheet is set to Move Pointer, the name of the currently selected
window (Input 1 or Input 2) appears at the base of your videotool control
window and, as you move your mouse in and out of the Input window, your video input flashes.
Solution: If you prefer to have more selection control over your video input window
(and do away with the flashing), set the Set Input Area to Click SELECT.
More about how to set these OpenWindows Workspace Properties is provided in your
Sun System User's Guide.
videotool Device Control Panel Functions Not Responding
Problem: videotool device controls don't work.
Solution: Check the videotool Device Control Panel is properly set up
Solution: Check that your cables are properly connected.
Solution: Check that your serial port setups are correct.
videotool Device Control Panel--Shared Memory Error
Problem: videotool JPEG movie functions return "can't use shared memory" message.
Solution: Check that your system is running the GENERIC kernel and that this
contains the shared memory resources required.
Note: If you're using a PowerVideo or XVideo/XV24SVC and you plan to use any
of the videotool JPEG functions, make sure that your SunOS kernel contains the following
options, and that these are not commented out: IPCSHMEM, LWP, ASYNCIO. Many SPARCstations
are often configured with the GENERIC_SMALL kernel, which doesn't contain these
options. For more information, contact your Parallax Graphics customer support representative.
videotool Device Control Panel--Initialization Error
Problem: If you've entered an incorrect Video Protocol and/or Device Name,
you'll receive a sequence of error messages like those shown below.
System error: Invalid argument--couldn't initialize device!
System error: Unable to initialize--video source OPEN failed!
Solution: Click OK to dismiss these messages. Then, return to your
videotool Device Control PAnel, and enter the correct information.
videotool Device Control Panel--Player Communication Error
Problem: Once you click the Initialize button, you receive a sequence
of error messages like those shown below:
Communication error with player: nnnnnnnnnn
Failed to reset player's status flag!
System error: Unable to initialize--video source OPEN failed!
Solution: You have entered the wrong Source Speed for your video device.
Click OK to dismiss these messages, and return to your Video Device control
panel to enter the correct information and/or check your connections before continuing.
Server Crashes During Memory-Intensive Tasks
Problem: While running other OpenWindows applications with videotool and the
Parallax Video extended openwin server, the server crashes.
Solution: The server is running out of swap space. Follow the steps in your
Parallax Video Software Installation Guide to increase your system swap space.


